Common Problems With Nest Thermostat Solved
Are you feeling the heat, or maybe the cold? It’s frustrating when your Nest thermostat isn’t working as it should, but don’t oworryt! In this comprehensive guide, we’ll dive into troubleshooting common Nest thermostat problems to help you regain control over your home’s temperature.

9 Common Problems With Nest Thermostat And Their Solutions
1) Nest not turning on heat
First, let’s check the circuit breakers to see if any switches have tripped. If you’re using a heat pump, try increasing the temperature setting and see if the outside unit kicks in.
For those with a furnace, take a look at the gas valve and make sure it’s fully open.
It’s also a good idea to ensure that the furnace door is closed properly. Modern furnaces have switches that cut power to the HVAC system when the door is not closed or not completely closed.
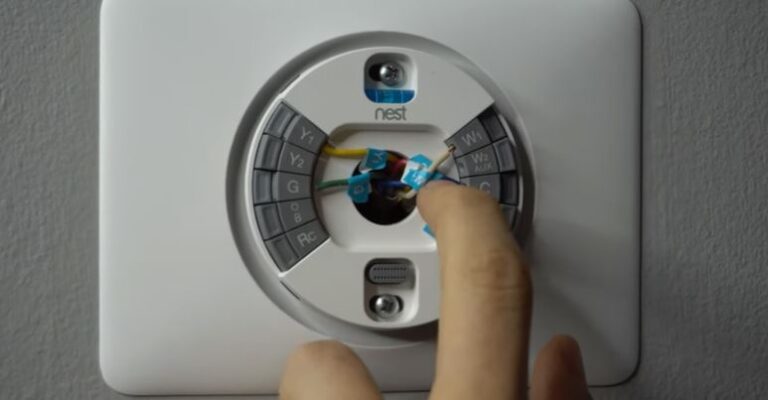
If you recently installed the Nest thermostat, remove the display and inspect the wiring. Make sure there’s a wire connected to the “W” terminal, as that’s responsible for heating.
Read: also: Nest thermostat not heating [Fixed]
2) Nest not cooling to set temperature
If your Nest thermostat is not cooling your home to the set temperature, there are a few troubleshooting steps you can try.
First, check the air filter, which is often located near the furnace. If it’s dirty or hasn’t been replaced in over 60 days, it’s a good idea to replace it. A clogged air filter can restrict airflow and affect cooling performance.
If your air filter is clean but the Nest thermostat is still not cooling properly, it’s possible that your air exchanger is turned on.
Typically, an air exchanger is used during the winter to bring in fresh air from outside. However, during the summer months, it should be turned off.
Read also: Nest not blowing cool air
When the air exchanger is on, it can counteract the cooling effect of your AC system. As you try to cool your home, the air exchanger will bring in warm air from outside, hindering the cooling process.
Therefore, make sure to turn off the air exchanger during the summer to optimize the cooling performance of your Nest thermostat.
3) Nest thermostat off but heating on
If you’re finding that your Nest thermostat is off but the heating system is still running, there are a few potential causes to consider.
Firstly, there may be a wiring or furnace issue causing a short circuit. When two wires come into contact, it can send a false signal to the furnace, instructing it to continue heating.
To investigate this, remove the thermostat from the wall and ensure that the wiring is not short-circuited, with no wires touching each other.
Read also: Nest blowing hot on cool setting
Another possibility is that the gas valve may be stuck in the open position. If the valve remains open, gas will continue to flow, and the burner will stay lit, resulting in continuous heating. It’s worth checking the gas valve to see if it’s functioning properly.
Additionally, check the battery level of your Nest thermostat if it relies on batteries. Weak batteries can cause various issues, so it’s a good idea to inspect them and replace them if necessary.
If your furnace persists in heating and you need an immediate solution, you can turn it off by flipping the furnace switch. Typically, this switch is located near the furnace installation.
Read also: How to replace battery on Nest thermostat
4) Nest thermostat keeps turning AC on and off
If your Nest thermostat is causing your AC to turn on and off rapidly (short cycling), there are a few potential causes to investigate.
Firstly, check for any loose wiring at your thermostat. Loose wires can create intermittent connections, leading to the AC cycling on and off.
Take a look at your thermostat wiring to ensure everything is securely connected and there are no loose wires.
Next, examine the wiring at the furnace or air handler terminal block or strip where the thermostat wires attach.
Make sure there are no loose wires in that area as well. Remember to turn off the HVAC system before touching any wiring to ensure safety.
Another possible cause for rapid cycling is not directly related to the Nest thermostat itself, but rather the AC contactor.

Weak batteries in the thermostat may not provide a consistent voltage to keep the contactor engaged, resulting in it repeatedly pulling in and out.
To address this issue, you may need to replace the batteries in your Nest thermostat to ensure a stable power supply.
Another problem would be a defective thermostat. But before you get a new one try bypassing the Y and R termina and see if the condenser unit will kick on, if it doesn’t and does nt cycle then the problem will probably be with the thermostat.
Other problems that can cause AC to short cycle include clogged air filters, dirt evaporator coil. These will all cause low air flow and consequently pressure drop
5) Nest thermostat ring sticks ( Ring Not Working)
If you’re experiencing a problem with the Nest thermostat ring not working , there are a couple of troubleshooting steps you can take.
Firstly, try restarting your thermostat. Additionally, check the battery level of your Nest thermostat and ensure it is adequately charged.
You can als charge your nest by removing it from its base and connecting it to a phone charger using a micro USB cable. Allow it to charge for a few hours and see if that resolves the issue.
When the dial on the Nest thermostat turns, but nothing on the screen moves and the device appears to be offline, it could indicate a power problem.
Check if there is a “C” wire connected to your thermostat, as this can help ensure proper power supply.
If you have a “C” wire or fully charged batteries, yet the ‘ring not working’issue persists, it’s possible that your thermostat is defective.
The standard warranty for the Nest Learning Thermostat’s 3rd generation typically lasts for 2 years. If your thermostat is over 2 years old, unfortunately, you may need to get a new one.
6) Nest wont turn on
If your Nest thermostat wont turn on and is blinking red light it means that the battery has drained and Nest is not receiving adquate power.
If your nest wont turn on and is blinking green, it means that it’s updating the software, starting up, or restarting. Typically, this will only last a minute or two.
If there is no light blinking………..
Tip #1: Check that the display is properly connected to the base
If your Nest thermostat isn’t turning on, there are several potential reasons to consider. Firstly, ensure that the display is properly connected to the base.
Check that the display is securely seated on the base and that no cables are obstructing its connection. Align the display and base connectors and firmly press the display onto the base until it clicks into place.
If the thermostat’s battery is extremely low, it may take up to an hour for it to turn on while charging, indicated by a blinking red light.
Tip #2: Ensure thermostat is receiving power
Next, verify that your system is receiving power. Try turning off and then back on the breaker or switch controlling the power to your system.
Make sure the switch is fully in the On position. If you have a fuse box, check if the fuse controlling power to your system is intact and functioning correctly. Replace it if necessary.
Tip #3: Confirm your system is compartible
Confirm that your system is compatible with the Nest thermostat. Incompatible systems can fail to deliver the necessary power to charge the thermostat’s battery and even cause damage. Systems such as millivolt, proprietary, or high voltage may not be compatible.
Tip #4: Check thermostat wiring
Check the wiring of your thermostat, particularly if you’re experiencing issues during installation. Before working on the wiring, turn off power at the system switch or fuse box for safety.
Ensure that each wire is fully inserted into the base and free from corrosion. Inspect each wire, trim any crooked or corroded ends, and reinsert them securely.
Reattach the display and restore power to the system.
Tip #5: Try charging your Nest
If the above steps don’t resolve the issue, you can temporarily charge the Nest thermostat using a USB cable.
Detach the display, connect a compatible USB cable to the USB port on the back, and charge it with a wall charger.
Eventually, the display will light up, prompting you to reconnect it to the base. Remember to fix the underlying problem as this is only a temporary solution.
7) Nest thermostat battery wont charge (Not holding charge)
If your Nest thermostat wont charge or is not holding charge, here are a few things you can do to fix this problem.
Install a C-wire: The lack of a C-wire connection can cause issues with the Nest thermostat’s battery charging. Consider installing a new wire from the furnace to the thermostat. You can alternatively get a Nest power connector.
Connect to a computer: Another surprising solution to a Nest thermostat that won’t charge is getting your Nest thermostat to reset and start working by connecting it to a computer via USB and ensuring it is “mounted” or recognized by the computer as a drive letter.
Just doing that does surprisingly seem to fix the problem many times.
Verify USB is charging properly : If you are attempting to charge the thermostat via USB, ensure that the USB connection is functioning properly by connecting it to a computer and checking for any signs of charging.
If you can see files on the computer then your USB is good..
Check battery health: If the Nest thermostat continues to have charging issues even with a C-wire, it’s possible that the battery is failing. You might want to contacting Nest support if your thermostat is still under warranty or search for replacement batteries online.
8) Nest thermostat no power wires detected
This typically occurs because the wire isn’t properly connected. It might also indicate that the wire was incorrectly inputted in the app. Verify the system wires to ensure they are correctly entered and appropriately connected.
9) Nest thermostat keeps going offline in app
If your Nest thermostat appears offline in the app, here are some troubleshooting steps to consider. First, ensure that your thermostat is connected to your home Wi-Fi network and that the network is working properly.
Check the Wi-Fi settings on your thermostat and make sure it is connected. If the Wi-Fi connection is fine, try restarting your Wi-Fi router.
Power cycling the thermostat by removing it from the base and reattaching it can also help.
If problem persists, low battery levels can also be a potential cause. Check the battery level on your thermostat’s display. If it’s low, the thermostat may not be able to maintain a stable connection.
To resolve this, remove the display from the base and charge it using a USB cable and a compatible wall charger.
Read also: Nest thermostat blowing cold air on heat setting
More reources: https://support.google.com/googlenest/answer/9243422?hl=en
![Honeywell Thermostat Blowing Cold Air on Heat Setting [Fixed]](https://thermostating.com/wp-content/uploads/2022/09/honeywell-furnace-thermostat-768x366.png)
![Honeywell hz311 troubleshooting Red Light [SOLVED]](https://thermostating.com/wp-content/uploads/2023/03/true-zone-jpg.webp)